In the previous tutorial, we learned a lot of technical details on how to use Houdini. In this tutorial, we will go into more depth and learn how to write code on geometry. Will this be fun? Why would anyone ask that? Of course!

The Data Structure in Houdini
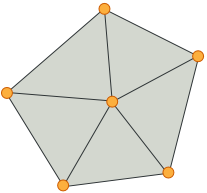
Everything in Houdini is made out of points, primitives and vertices. A quick overview:
- Points: An indexed set with given positions. They form the bases of all geometry. Id: i@ptnum.
- Primitives: An indexed set of connectivity data. This includes line segments, triangles, polygons, and tetrahedra. Id: i@primnum.
- Vertices: The link between primitives and points. For each primitive attached to a point, there is a vertex attached to that point. Id: i@vtxnum.
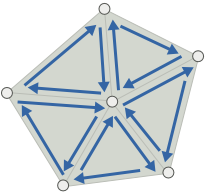
Bonus: For each vertex there is also a half edge. Half edges show how the vertices are linked to each other and are very important for many tasks.
The Code Nodes
Houdini comes with its own programing language called VEX which is similar to java and c++. It is optimized to handle operations on all points, primitives, vertices in parallel and is easy to use. All code will be written inside special nodes called attribute wranglers.

Clicking on these nodes reveals the options with a special field where code can be written into the. Notice that each wrangler can be set to run over each point, each primitive, each vertex or a single time only on the global parameters of the attributes (Detail).

The Attributes of Houdini
Any relevant piece of information is stored as an attribute. Position, Normal vector, color, transparency, uv texture coordinate, index, arrays, matrices etc. Attributes are always initialized and accessed using
type@name
The relevant types are the following:
- i@… integer
- f@… float
- u@… 2D vector
- v@… 3D vector
- p@… 4D vector
- 2@… 2D matrix
- 3@… 3D matrix
- 4@… 4D matrix
- s@… string
- array version of the above.
These attributes then live where they are used. For example, every point has v@P as its position vector. Once you start working with v@Cd, you make Houdini use that vector as an RGB color definition. Once you start working with v@N, Houdini uses that as its normal vector definition.
Notice that if a non-existant attribute is called, then Houdini initializes it with zero by default. Be aware of that when checking for typos.
Looking at Attributes
There is a fantastic tool to overview the attribute values. It is called the Geometry Spreadsheet. Open its tab and you will find 4 Icons on top for each of the following: points, vertices, primitives, detail. This will allow you to observe the attributes at every element and you will quickly be able to see errors here if something is wrong with your code.

If you are debugging your code and wondering what the intermediate values of a variable are, just throw it into the geometry spreadsheet by creating an attribute for a quick check.

Getting Started with the Exercises
Head over again to the download section and get the folder 02 Getting Even More Started with Houdini. Open up the .hip file located inside the folder.
EXERCISE 1
The demo file you downloaded is thoroughly documented. Go through the nodes, read the code with its comments, and visualize each step to see the node’s effect.

EXERCISE 2
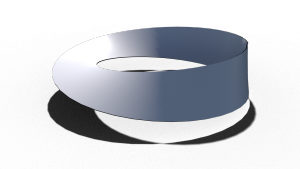
Find a parametrization of a Möbius strip online and implement it! Use a grid node as the starting domain.

The Möbius strip is a bit spooky because it is not orientable. This can cause problems with some algorithms that depend on the normal vector.
EXERCISE 3
Be creative! Do something fun (or spooky)!
